Here is Part 2 of Brad Lowery’s article on SPIRIT FINGERS. This is a more detailed break down of the benefits and objectives of this drill for all you nerds out there!
Here is a link to Part 1 of this article in case you missed it.
Article:
If you’re familiar with the BetterRide curriculum then you’ll know the cornering cues can be broken down like this:
- Vision: most important always, look through the corner to where you want to go
- Body position: balanced and relaxed
-
-
- All your weight on the pedals
- Hinge! Chest and back flat
- Elbows up and out
- Counter Pressure
- Stay above the bike (don’t lean with the bike)
-
-
- BLLR:
-
-
- BRAKE in a straight line before the corner,
- LOOK through the corner,
- LEAN* the bike (not your body) by counter-pressuring,
- RELEASE* the brake, and roll through
-
-
*Note: Lean and Release should happen at the same time. We don’t want to be braking to cut speed while leaning the bike.
When working on a cornering drill, even on flat ground with plenty of traction that can be a lot to keep up with.
You probably don’t realize how much your grip on the bars is interfering with your cornering, but it can really throw off your balance and your bike’s ability to corner the way it was designed to. And it only gets worse on the trail when things get rougher.
SPIRIT FINGERS to the rescue!
Let’s break down the benefits and objectives of this drill:
- Primary Gains:
-
-
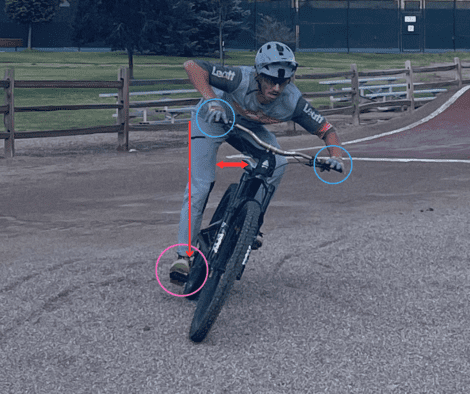
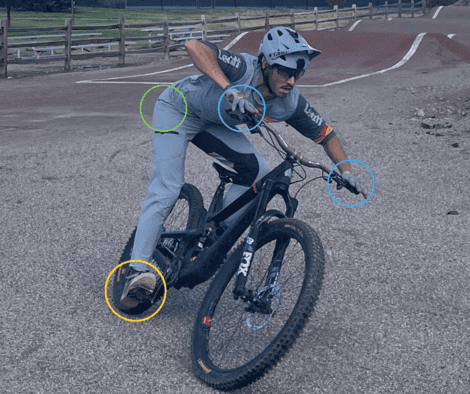
- No death grip: hands will be nice and relaxed
- No weight in the hands: all your weight will be in balance on your outside pedal
- Feel it: You’ll really be able to feel and hear how your bike wants to lean and carve a turn rather than be steered
-
-
- Secondary Gains:
-
-
- Heels Dropped: Forces you to drop your heels which gets you locked in, low and stable
- Hinged: You will naturally hinge more to find balance which puts you in a strong position
- Outside Foot Dropped: No more mixing this up, you can ONLY do this with the outside foot dropped and you don’t have to think. It will happen automatically
- Weight OVER the bike (the goal of body/bike separation)
- Braking Done Early: Since you’ll be cornering without your fingers on the bars you won’t be able to brake in the corner.
This will really ingrain the correct behavior of on the brakes BEFORE the corner and then off IN the corner
-
-
Let’s have a look: (color-coded)
How to Progress:
- Even with the Spirit Fingers drill, you can still cheat a little bit by having too much weight in your palms.
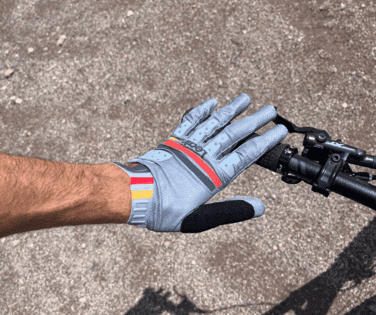
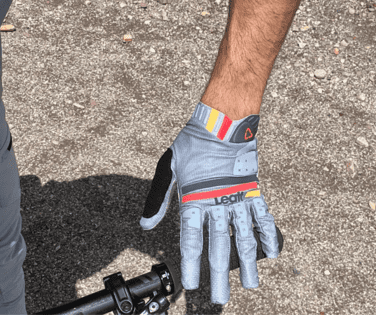
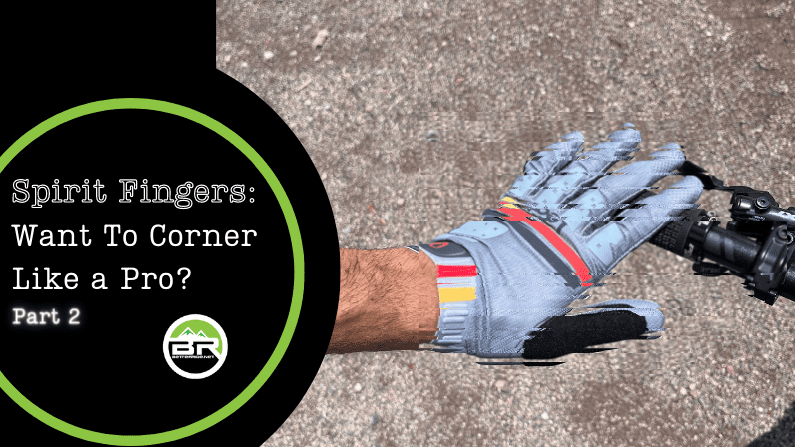
Once you’ve gotten comfortable with the previous drill from SPIRIT FINGERS Part 1, you can take it a step further by sliding your hands back off the bar so you’re resting on your proximal phalanges or the first bone in your fingers.Your fingers will be more sensitive to pressure and provide you with better feedback if you are “cheating”.
The goal here is to reduce pressure in your fingers from the handlebars to zero.
This position will still give you plenty of control on smooth surfaces to counter pressure while ensuring you will be in the most balanced position.
The goal is to have no weight on the inside foot, BUT taking your foot off the pedal is unnecessary.Hovering over it is fine to achieve this. If you can do this you will really FEEL the weight in the OUTSIDE pedal and the counter pressure in the handlebars. This will also make sure you are directly OVER the top of the bike.
This requires A LOT of balance so work up to it slowly. This will complete the feedback loop for the best cornering body position AND help you feel and hear the grip you’ve created in the tires as they carve up the ground.3. Once you’ve got this nailed, find a hill with a mild pitch. Set up some cones like a slalom course and work through it with the BLLR steps + 1 extra in this order:
- BRAKE hard before you start your turn
- LOOK through the corner and the next few corners/cones
- LEAN + RELEASE x 2:
REMEMBER: these all happen at the same time. Here we are adding a second RELEASE which are your fingers gripping the bars.
As soon as you have finished cutting speed braking, release the brake and open up your hand into the SPIRIT FINGER position.
Tip: Parking garage ramps work great for this and provide lots of traction!
4. If you are really feeling that extra grip you’re creating with this drill you can put it to work on some new terrain! I suggest starting with a flat gravel parking lot at first then working your way up from there. I like to practice this on flat and banked corners on my local trails, just make sure they are smooth so you don’t risk your handlebars getting knocked around.
Time to take it to the trail!
Before starting down any descent or technical section you may recall the tip to bounce a little in your feet to get centered and balanced. Spirit Fingers is a great compliment to this!
While bouncing slightly on the balls of your feet, pay attention to the weight/ pressure of your hands on the bars. Try to open (slightly) and relax your grip while doing this at the start of your descent.
If you do it often enough you’ll begin to notice immediately when you are out of balance. This is a great way to “reset” while on the trail and get yourself quickly back into balance.
When riding a trail I feel really comfortable on, especially flowy green and blue trails, I love to practice this.
While I rarely do full Spirit Hands on the trail in case the bars get knocked around, I do attempt to replicate the FEELING. By loosening your grip and resetting your balance before every corner or technical section, you can achieve the same results!
I recently tried this on one of my local trails with lots of corners and I realized something awesome. Not only did this little reset get me back in balance but it put me into the Flow State immediately! I was working with the bike and it was effortless. The grip I was able to create felt incredible. By the time I got to the end, I was hooting and hollering out loud because it just felt so good! Get out and give it a try!
Please share this article with anyone you think may benefit and feel free to call or e-mail with any questions.
Thanks and create your best ride yet,
Gene

Comments