You understand how to set your suspension sag (if not go to your bike brand’s website, they will tell you for your specific model), you know what the rebound adjustment does (again go to your bike brand’s website or your suspension brand’s website for more on this if you don’t know what it does) but you want to get your bike dialed in exactly for you, your speed, your trails, the way you ride them. I’m here to help!
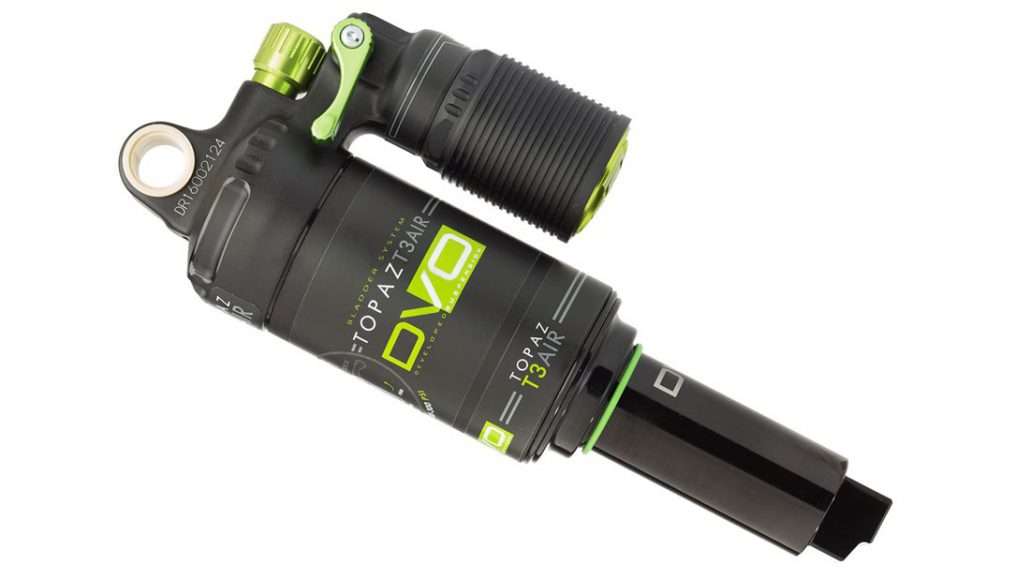
This article is on how to optimally set your suspension and tire pressure for descending at your best, so you have as much control as possible descending at the speeds you like to ride. It should also set it up well for technical climbing too on most bikes too (especially with the use of the adjustable “platform” or “threshold damping control” (the green lever on a DVO Topaz, see photo, the lever is blue on many other shocks) with three settings, descend, all-mountain and climb).
I was practicing for the first South African National Downhill race (on my 130mm travel trail bike, this article is not just for downhillers!) the other day and I had a great time getting my bike dialed in. I thought I would share this process with you and how your suspension and tire pressure (and even tire type) can vary greatly depending on your goal.
Where I live when I’m in South Africa I don’t have the best trails for descending nearby and have a lot of steep fire roads to climb. So I bought a 29r wheelset with lighter tire casing to use here (instead of my usually 27.5 plus tires with “enduro sidewalls” (sidewalls that are a little thicker, stronger and cut resistant than normal trail tires but not as heavy or stronger as downhill tires)). The 29er set up with light, narrower tires is a little sketchy on the descents (which actually makes mellow descents more fun as they now require more skill) but much more enjoyable on the long and steep climbs.
After watching a GoPro video of the track it looked smooth and flat, the perfect track for my lighter 29r tires even though their cornering is poor. That’s why I hate GoPro footage! Turns out the track was much steeper in places, the corners were sharper than they looked in the video and loose as heck, after one run I switched to my 27.5 plus tires! It took a few runs to get used to those tires, their low pressure and added weight again (I usually run them at 13 psi in the front and 16-18 psi in the rear) but I was instantly impressed with how more traction they had for braking and cornering.
After that, I noticed that the softer tire pressure made the bike “bounce” a bit off some bumps so I slowed my rebound 2 clicks front and rear and it felt much better. I spent the rest of that afternoon just learning the track and picking lines.
The second day was fun but nearly all business as my speed on the track really picked up and every single run the bike did something I didn’t like and it needed some fine-tuning. The first run I dinged my front wheel and the tires felt a little squirmy in the berms so upped the pressure to 15 psi in the front and 18 psi in the rear (remember these are plus size tires on a track with only two small rock sections, at a rockier place like Bootleg Canyon I would up the pressure a bit).
Upping my tire pressure encouraged me to push a little harder and this time it was my rear suspension that felt a little soft (when pushing into the corners it would compress too much causing the rear of my bike to squat and then rebound), making cornering a bit unpredictable. First, instead of increasing my rear shock pressure I switched the “pedal platform” from “descend” to “trail”. This enabled me to keep the low pressure I was running (about 33% sag instead of 25%) for the steeps but firm it up a bit in the corners.
Whenever you adjust the rear suspension it affects the front suspension too. By stiffening my rear suspension I was riding a hair higher in the travel and more centered over my bottom bracket. This slightly steepened the head angle of my bike and put more weight than previously on the front of my bike. Now my front fork that was too soft, it was diving at the bottom of a steep g-out and in some corners. So I upped the high-speed compression damping by six clicks and took another run. That wasn’t enough, my fork was still diving so I increased the air pressure from 110 to 120 and backed off those six clicks on the high-speed compression knob.
That felt much better but my speed had increased a little more and now the rear suspension was a little too soft, so I upped the pressure by 5% (200 psi to 210 psi, one click slower on the rebound to keep the rebound the same as before the pressure increase) and it felt much better! I did one run with the damper switch on “trail” and one on run on “descend”. With the extra air pressure descend felt better. Finally dialed and ready for the race.
Here is a summary of what I did, why I did it and how you should do this.
- I was fortunate to have a perfect two-minute test track with a paved shuttle! This enabled me to ride the same trail 10 times and make adjustments to my bike after every lap in only hours. A one to two-minute test tracks is awesome for testing bike setup! You can use longer trails and make adjustments on the trail but the trail may change (go from rough to smooth, fast to slow, etc) so you aren’t sure if your setup is better or the trail just smoothed out. By using the same trail you are hitting the same bumps and corners at the same speed when comparing adjustments.
- I would do this on what you feel is your “typical” trail, similar to what you ride most of the time. Then set it, write it down and don’t spend too much time worrying about it unless your speed changes greatly or you are riding a trail with a big difference in speed and/or surface). For most of us, it isn’t our suspension that holds us back, it is our skill!
- An example of speed and terrain differences is Porcupine Rim in Moab. On that trail, there are spots where you are hauling tail through rock fields, much higher speeds than most other trails in Moab. I always want to increase my tire pressure by 10-15% for that trail and usually stiffen my fork a bit too. Last spring I was so excited for my first Porcupine lap that I forgot to add that tire pressure and destroyed my rear rim and tire!
- Write everything down in your journal. What the current settings are, how they felt, what you changed and why (was bottoming out so I increased rear shock pressure from 200 psi to 210 psi) then how the new setting felt. You might be surprised how often you return to these notes.
- Adjust one thing at a time, if you adjust two things at once and it feels better you don’t know which change made it feel better. The only exception is with rebound if I increase the air pressure in my shock I need to slow the rebound a click or two so it stays the same speed.
- Warm up before doing any testing! Our main suspension is our body and when we are cold it doesn’t move as quickly or as fluidly. If you start cold as you warm up every adjustment will feel better as your body is working better!
- Once you find perfect, write it down including conditions (fast, dry trail with lots of braking bumps and loose corners). That way you know where to start if the conditions change, your speed changes or you lose air pressure and/or accidentally change your rebound or compression adjustment. In general, the faster you go the more you want to stiffen up the suspension and tire pressure (as you hit things harder the faster you go) and the slower you go (or trail forces you to go, you want to soften your suspension and tires pressure (as you hit things softer and put less force on the tires in corners).
- After setting sag and/or initial air pressure in your suspension you are in the ballpark of where your air pressure should be but it may still need a 5-15% change in pressure to get it dialed. What you are shooting for is getting full travel (bottoming out) at two to three times on a rough two-minute descent. If you aren’t getting full travel you aren’t using all of the suspension available to you if you are bottoming out harshly, or more than three times in a short downhill you need to increase the pressure.
- Always set sag/air pressure first, as changing air pressure greatly affects your rebound speed.
- Many forks and more expensive rear shocks also have low-speed and high-speed compression damping. The speed, in this case, is the speed the shock is moving. This usually has to do with the size of what you are hitting, small bumps like gravel work the slow speed damping. If you notice your bike feels like it isn’t hooking up as well as it could be, try decreasing the low-speed damping (or decreasing the air pressure). If your suspension feels too linear (like the last bit of travel moves as easily as the first bit of travel) or is bottoming out try increasing the high-speed compression
- Coil springs are becoming more popular on trail bikes and have always been very popular on downhill bikes. Getting the right weight spring is very important. If you need more than three full turns of preload on the spring you need to go up in spring weight. Increasing preload will also speed up your rebound speed.
- Rebound speed is largely personal preference. A great starting point is to have the shock and fork rebound at about the speed your arms and legs would move to return to the “ready” position. from there if after the shock you have absorbed it feels like the bike wants to push back against you like a pogo stick try slowing the rebound. If it feels like the suspension gets harsher with each successive bump try speeding up the rebound (this will allow your suspension to return to it’s “ready” position before the next hit. To make you bike feel predictable it is nice to have the same rebound speed front and rear.
- As for tire pressure, in general, you want to run as low a pressure as you can without, burping the tires, dinging your rims, having your tire squirm in the corners or flatting. Lower pressure gives you better traction and better small bump compliance.
Lastly, spend some time on this! Bikes, suspension, and tires are amazing these days, but I have felt some riders suspensions setup that were terrible. I had a student who hated is new, $5,000 bike. I rode and realized why the rear suspension was way to stiff for him and the front shock too soft. By simply spending a few minutes setting the correct air pressure and adjusting his rebound he went from hating the bike to saying it was the best bike he had ever ridden!
Feel free to share this article with anyone you feel could benefit from it. Post any suspension or tire pressure comments below.

OK so I am curious where you would start. 2017 Yeti 27.5+ 3″ high rollers front and back. Fox 34. Rider weight 170 +12-15 in gear/pack. At moment running 15/14 in the tires 190/90 for suspension
Hi Justin,
I have no idea! That’s why I wrote my article. I would have to interview you after every ride down a 1-2 minute trail and ask: How did that feel? Then listen to your answer and make adjustments based on your feedback.
Even if I knew which model Yeti you have, which rear shock, which side wall on your High Rollers it would still be next to impossible without testing.
Please reread my article and go out and test your bike’s settings!
Regarding bottoming out
You say you should decrease air pressure until you bottom out at least once per ride. My air shock sag is at 30%, yet I only get about 85% of my full travel.
Should I drop sag even more? That would put me over 30%
Same question for the fork. I am at 25% sag on my fork
Hi Douglas,
Great question! I believe I also said on a rough trail, if your trails are smooth you are unlikely to bottom out.
First, establish if you are only getting 85% of the bikes designed travel. I’ve had a few bikes, my 2017 Trek Fuel 9.8 being one, where the shock itself only used about 80% of the shocks travel to achieve 100% of the bikes travel (the shock’s shaft was longer than it need be).
If you are on rough trails with 30% sag and only getting 85% of your travel you are either not very aggressive (nothing wrong with riding at speeds you feel safe) or you are going pretty fast and your suspension is “ramping up” too much (getting stiffer and stiffer the deeper into your travel. The cause of this ramping up could one or a few of the following: Your shock is not suited or tuned for your bike design, poor suspension design (too much rising rate designed into it, which, if it is a newer bike seems unlikely), something is wrong with your shock.
If you are indeed riding rough trails fairly aggressively with 30% sag and only getting 85% travel something is amiss. I would take it to a knowledgeable shop and have them check it out.
I hope this helps!
Hi Gene,
Very cool article!
I have a question what do you mean by aggressive riding? Pumping and jumping everything on the trail?
Not being a passenger on the bike ?
Can a rider be aggressive and smooth in the same time ?
Cheers,
Vlad